
Low and slow never tasted so good. Follow this simple, step-by-step guide to smoked brisket that’s fall-apart tender and packed with deep BBQ flavor.
Why I Love This Recipe
Brisket is the heart of real BBQ. When it’s done right, it’s rich, smoky, and melt-in-your-mouth tender. It’s also one of the most challenging cuts to master, which is part of what makes it so rewarding. There’s something special about tending the fire for hours, smelling that smoke roll, and finally slicing into a brisket that’s just right.
If you’re new to brisket, don’t worry — it sounds intimidating, but once you’ve cooked one, the process starts to feel natural. The key is patience and paying attention to a few simple details that make all the difference: picking the right cut, trimming it properly, keeping your temperature steady, and giving it plenty of time to rest before slicing.
The brisket comes from the cow’s chest — a hard-working muscle that carries a lot of weight and has plenty of connective tissue. That’s why we cook it low and slow: to break down that tissue and turn it into something buttery and tender. A whole “packer” brisket includes both the flat (leaner section) and the point (fattier section used for burnt ends). When you buy one, aim for a Choice or Prime grade if you can find it — the extra marbling really pays off.
Cooking Basics
Trim the Brisket
Trimming is easier when the meat is cold. Take the brisket straight from the fridge and start by removing any large chunks of hard fat or silver skin. On the fat cap side, trim it down to about ¼ inch thick — just enough to protect the meat during the long cook.
Your goal is to give it an even, aerodynamic shape so it cooks evenly.

If this is your first brisket, I highly recommend watching a trimming tutorial — Matt at Meat Church BBQ has a great one on YouTube that shows exactly what to look for.
Season It Up
You can use a binder like yellow mustard or olive oil to help the rub stick, or skip it entirely — it won’t affect flavor. A simple Texas-style rub of salt and pepper is classic, but I like to mix things up with Meat Church Holy Cow or a combo of Holy Gospel and Holy Cow for a deeper bark.
Apply a generous coating on all sides and let it sit in the fridge overnight so the rub has time to settle in.

Fire Up the Smoker
Preheat your smoker to 225°F. Mesquite, hickory, and oak are all great choices for wood. I personally use Pit Boss Competition Blend pellets because they give a balanced flavor and are easy to find in my area.
If you’re using a standard grill, make sure you’re cooking with indirect heat and use a smoke tube to keep the smoke flowing.
When you’re ready to cook, place the brisket fat side down (toward the heat source) with the point closest to the fire. This helps protect the leaner flat from drying out.

Low and Slow
Plan for about 1½ hours per pound of meat, but give yourself a few extra hours in case it finishes early — it can rest in a cooler for hours if needed.
Leave the lid closed as much as possible and spritz every hour after the first two hours to help the bark develop and stay moist. I use apple cider vinegar, but you can experiment with other liquids like apple juice, beef broth, beer, or a mix.
Cook until the internal temperature hits 165°F, then it’s time to wrap.
Wrap It Up
You’ve got two good options here: foil or butcher paper.
- Foil locks in more moisture and is easier to seal, but can soften the bark.
- Butcher paper lets the bark stay firm but can let out a little more moisture.
For your first brisket, foil is usually the safer route — it’s more forgiving. Wrap it tightly and put it back on the smoker, keeping it in the same orientation as before.
The Finish and the Rest
Continue cooking until the brisket reaches 203°F internal temperature. Then test for doneness with your thermometer — it should slide in with little resistance, like warm butter.
When it passes the probe test, wrap it in a towel and place it in a cooler for at least 1 hour, or up to 4–5 hours if it’s done early. The rest lets the juices redistribute and makes a huge difference in tenderness.
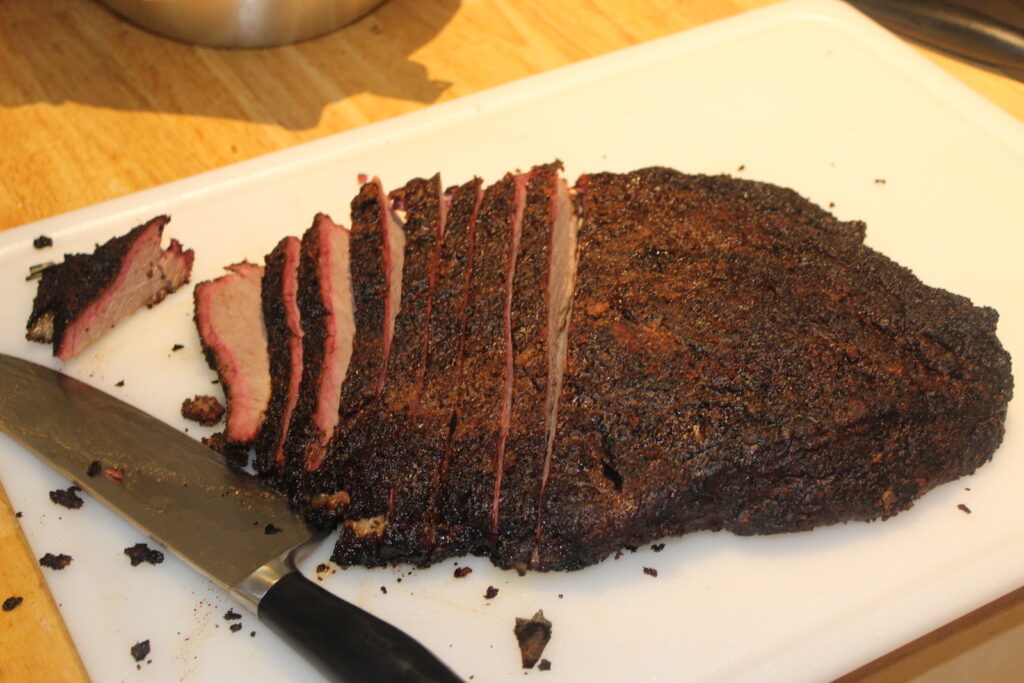
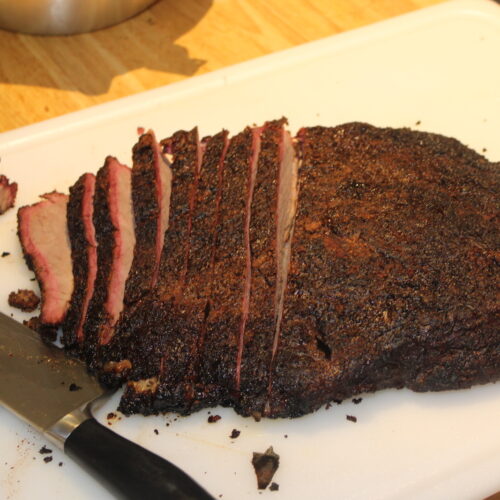
Slicing
Unwrap your brisket and place it on a cutting board. Start by slicing against the grain through the flat section. Once you reach the point, you’ll notice the grain changes direction — rotate the brisket 90 degrees and continue slicing.
Cut the flat into pencil-width slices, and the point slightly thicker.

Final Thoughts
risket is one of those cooks you learn something from every single time you make it. The hardest part for most people — myself included — is keeping the meat moist through such a long cook.
A few tricks that have worked for me:
- Use a water pan under the brisket to add humidity. It helps protect the meat but can extend the cook time.
- Try an injection — it adds flavor and moisture throughout. A simple mix of beef broth, Worcestershire sauce, and melted butter works great.
- Brining the brisket for 24 hours before cooking can also make a noticeable difference in juiciness.
You can also experiment with wrapping methods, spritz liquids, or rub variations. Every pit and every piece of meat cooks a little differently, and finding what works for you is half the fun.
And if you’ve never made burnt ends from the point, you’re missing out — cube them up, toss with sauce, and cook until caramelized. They’re little bites of BBQ gold.
🔥 So fire up the pit, and let’s grill and chill.
Smoked Brisket (The Ultimate Low and Slow BBQ Classic)
Ingredients
- 10 lb Whole Packer Brisket (Prime or Choice Grade)
- 1 cup Seasoning Mix (Use Texas Style shown below or yrou own favorite brisket rub)
- 1/2 cup Apple Cider Vinegar (or use your favorite spritz liquid)
Texas Style Rub
- 1/2 cup Salt
- 1/2 cup Black Pepper (coarse)
Instructions
- Trim brisket cold, removing silver skin and excess hard fat.10 lb Whole Packer Brisket
- Apply binder (optional) and coat evenly with rub. Let rest in fridge overnight.1 cup Seasoning Mix
- Preheat smoker to 225°F (use oak, hickory, or mesquite).
- Place brisket fat side down, point toward heat source.
- Smoke for 2 hours, then spritz every hour until internal temp hits 165°F.1/2 cup Apple Cider Vinegar
- Wrap tightly in foil or butcher paper and return to smoker.
- Continue cooking until internal temp reaches 203°F and passes probe test.
- Wrap in towel and rest in cooler for at least 1 hour.
- Slice against the grain, turning 90° at the point.
- Serve and enjoy!
🛠️ Tools & Ingredients I Use


")
")
")
")
")