Looking for something different to serve at your next holiday feast? This smoked maple turkey is a fun twist on the classic roasted bird. Brined with honey and injected with a maple butter blend, it turns out unbelievably juicy with a subtle sweetness that pairs perfectly with smoky flavor.
If you’ve never tried turkey on the smoker, this recipe is a great place to start. The prep is a little more involved than throwing a bird in the oven, but the payoff is huge. Between the brine, the injection, and cooking it spatchcocked, this ended up being one of the best turkeys I’ve ever made.
Why I Love This Recipe
I’ve always liked turkey, but I’ve never been blown away by it — until I tried smoking one. The combination of brining, injecting, and cooking it low and slow makes a massive difference. This version stays incredibly moist, and the maple butter gives it just enough sweetness to make it interesting without overpowering the turkey flavor.
What really sold me was the gravy. The drippings from this cook were next-level. Smoky, slightly sweet, and packed with flavor. Honestly, that gravy alone was worth making the whole bird.
Cooking Basics
Choosing the Right Turkey
The first challenge with this recipe is actually buying the turkey. Most grocery store turkeys are pre-injected with brine, which limits how much flavor they can absorb. Look for one with the lowest “percentage added solution” you can find. Organic turkeys usually work best.
If you can’t find one that’s unbrined, you can still make this recipe — just skip the brining step and rely on the injection for flavor.sp up during the cook. If you’re in a hurry, at least pat them dry with paper towels before seasoning.
Brining the Turkey
You’ll want to brine the turkey 1–2 days before cooking. Heat the water, salt, honey, and broth until the salt dissolves, then cool it down with ice before adding the turkey. Keeping the brine cold is critical for food safety.
Spatchcock & Season
Once brined, pat the turkey completely dry. This helps the skin crisp up later.
Spatchcocking means removing the backbone and flattening the bird. It helps the turkey cook faster and more evenly, and it exposes more skin to heat for better crisping.
After flattening, inject the maple butter into the breasts, thighs, and wings. Then coat the skin with your rub.
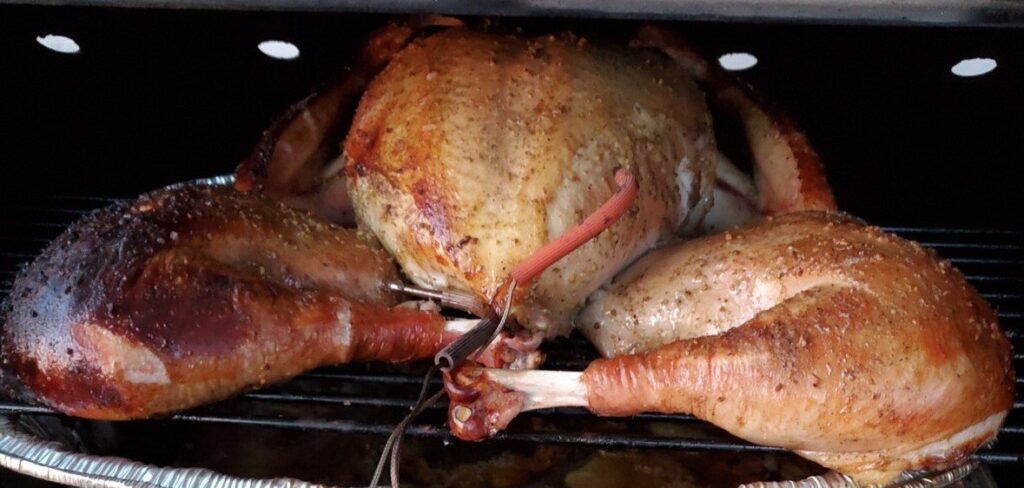
Real-World Note: You’ll notice in my photos that I ended up removing the legs instead of keeping the bird fully spatchcocked. My smoker was a little tight on space, so separating the thighs helped everything fit better and cook more evenly.
The core idea is the same — flattening the bird for faster, more even cooking. If your smoker has the room, I still recommend full spatchcock. If not, separating the legs will gain you some speed in cooking.
Smoke Low and Slow
Start the cook at 225°F for the first hour to maximize smoke flavor. Use hickory or maple if you have it.
Place a drip pan under the bird for gravy and insert probes into the breast and thigh.
After one hour, raise the temperature to 350°F to crisp the skin and finish cooking.
Finish and Rest
The turkey is done when:
Breast hits 165°F
Thigh hits 175°F
Let it rest at least 10 minutes before carving.
Final Thoughts
This turkey is easily one of my favorite holiday cooks I’ve done.
Separating the Legs: I removed the thighs from the body on this cook to help them finish evenly and fit better in the smoker. It worked great — I pulled them early and rested them while the breast finished.
Injection Technique: Next time I’ll use the multi-hole injector tip. The flavor was amazing, but I want it spread even more evenly.
Extra Crispy Skin: For even better skin, mix a little cornstarch into the rub or spritz with spray butter during the high-heat phase.
Don’t Skip the Gravy: The drippings are gold. Thin them slightly with water or stock and make gravy — it’s insane.
Smoker Space Reality: If your smoker is tight on space, don’t be afraid to separate the legs like I did. It makes fitting the bird easier and lets you pull dark meat early if needed.
🔥 So fire up the pit, and let’s grill and chill.
Smoked Maple Turkey (Sweet, Smoky, and Incredibly Juicy)
Looking for something different to serve at your next holiday feast? This smoked maple turkey is a fun twist on the classic roasted bird. Brined with honey and injected with a maple butter blend, it turns out unbelievably juicy with a subtle sweetness that pairs perfectly with smoky flavor.If you’ve never tried turkey on the smoker, this recipe is a great place to start. The prep is a little more involved than throwing a bird in the oven, but the payoff is huge. Between the brine, the injection, and cooking it spatchcocked, this ended up being one of the best turkeys I’ve ever made.


")
")
")
")
")
")